Introduction to Gradle Build
Automation Tool
Hi All, Here I would like to discuss about Gradle
Build Automation Tool. Kindly note that this is simple learning plan that I was
prepare for myself and I am still reading in this field.
Build Automation
Before
discuss about Gradle build tool, I think it will be very helpful to have an
understanding about build automation.
What is Build Automation Tool?
Build tools are programs
that automate the creation of executable applications from source code (eg.
.apk for android app). Building incorporates compiling, linking and packaging
the code into a usable or executable form. Basically build automation is the
act of scripting or automating a wide variety of tasks that software developers
do in their day-to-day activities like:
1. Compiling source code into
binary code.
2. Packaging that binary code.
3. Running tests.
4. Deployment to production
systems.
Reason for Using Build Automation Tool
In
small projects, developers will often manually invoke the build process. This
is not practical for larger projects, where it is very hard to keep track of
what needs to be built, in what sequence and what dependencies there are in the
building process. Using an automation tool allows the build process to be more
consistent.
Available Build Tools
·
For
java - Ant,Maven,Gradle.
·
For
.NET framework - NAnt
·
c#
- MsBuild.
(Credits
goes to Ritesh Gune – stack overflow)
Before Comparing
Usually
as humans when we get or deal with something we start to compare it with other existing
things which has the same capabilities .It will be a greater mess if we have no
better understanding about each in individually. So this will be the right time
to look at Ant and Maven before discuss about Gradle Build tool.
Introduction to Ant

Apache
Ant is the Eldest fellow among modern build tools. Ant uses XML to
describe the build process and its dependencies. Ant made it easy for willing
developers to adopt test-driven development, and even Extreme
Programming.
One
of the primary aims of Ant was to solve Make's portability problems. Ant solves
this problem by providing a large amount of built-in functionality that is
designed to behave the same on all platforms.
Limitations of Apache Ant
Ant build files, which
are written in XML, can be complex and verbose. The complex structure
(hierarchical, partly ordered, and pervasively cross-linked) of Ant documents
can be a barrier to learning. The build files of large or complex projects can
become unmanageably large.
Introduction to Maven

Maven is a project management
tool which can used for building and managing any Java-based project. Maven’s
primary goal is to allow a developer to comprehend the complete state of a
development effort in the shortest period of time. In order to attain this goal.
Mavens Objectives
Making the build process
easy
While using Maven doesn’t
eliminate the need to know about the underlying mechanisms, Maven does provide
a lot of shielding from the details.
Providing quality project
information
Maven provides plenty of
useful project information that is in part taken from your POM and in part
generated from your project’s sources. For example, Maven can provide:
·
Change log document created
directly from source control
·
Cross referenced sources
·
Mailing lists
·
Dependency list
·
Unit test reports including
coverage
As Maven improves the
information set provided will improve, all of which will be transparent to
users of Maven.Other products can also provide Maven plugins to allow their set
of project information alongside some of the standard information given by
Maven, all still based on the POM.
Maven aims to gather
current principles for best practices development, and make it easy to guide a
project in that direction.
For example,
specification, execution, and reporting of unit tests are part of the normal
build cycle using Maven. Current unit testing best practices were used as
guidelines:
·
Keeping your test source code in a
separate, but parallel source tree
·
Using test case naming conventions
to locate and execute tests
·
Have test cases setup their
environment and don’t rely on customizing the build for test preparation.
Maven also aims to assist
in project workflow such as release management and issue tracking.
Maven also suggests some
guidelines on how to layout your project’s directory structure so that once you
learn the layout you can easily navigate any other project that uses Maven and
the same defaults.
Maven provides an easy
way for Maven clients to update their installations so that they can take
advantage of any changes that been made to Maven itself.
Installation of new or
updated plugins from third parties or Maven itself has been made trivial for
this reason.
Comparison table for
major advantages/disadvantages - Maven vs Ant.
Maven
|
Ant
|
Description of project
|
Development of a build
script per project
|
Invocation of defined
goals (targets)
|
Invocation of project
specific targets
|
Project knowledge
|
"Just" the
build process
|
build lifecycle,
standard project layout
|
too complex scripts
|
reusable plugins,
repositories
|
scripts are not
reusable
|
moving fast forward
|
development are slowed
down
|
(Table credit goes to - http://www.javafaq.nu/java-article1168.html)
Brief Introduction to
Gradle

Gradle
is a build automation tool which is used for building, Testing, Publishing
deployments, Packaging Software. Build automation means helping developers to
complete their software development without unnecessary efforts for
·
Directory
preparation
·
Compilation
·
Packaging
·
Managing
dependencies
When
we use automated build tool it manage the required libraries and dependencies.
Simply gradle is a build automation tool which has
·
A
very flexible general purpose build tool like Ant.
·
Switchable,
build-by-convention frameworks like Maven.
·
Very
powerful support for multi-project builds.
·
Very
powerful dependency management (based on Apache Ivy).
·
Full
support for your existing Maven or Ivy repository infrastructure.
·
Support
for transitive dependency management without the need for remote repositories
or pom.xml and ivy.xml files.
·
Ant
tasks and builds as first class citizens.
·
Groovy
build scripts.
·
A
rich domain model for describing your build.
Comparison between Three Build Tools
- Ant has the issue of lack of
conventions, because of that need to specify everything. Simply it’s not
readable
- Maven has many conventions. Maven POM
allows us to mention the dependency and it will resolve the dependency
when it needed without developer interaction (No more struggling with
jars).
- Maven written in xml and maintainable
than ant.
If
you are new to this probably you may confused with the meaning of “Gradle
is declarative and uses build-by-convention”. What
does this mean? Before going into the depth of the meaning let’s see the
difference of imperative programming and declarative programming.
- With imperative programming,
you tell the compiler what you want to happen, step by step
- With declarative programming,
on the other hand, you write code that describes what you want, but not
necessarily how to get it (declare your desired results, but not the
step-by-step)
Using
gradle we can achieve declarative build. Declarative build is the goal of the
gradle. In declarative approach we no need to deal with steps (No lots of codes
in build file).It’s much readable than past once. It helps to overcome the
difficulty in maintaining, accessing and testing.
Now
let’s dig down into our problem.
Build-by-convention
Build
by convention is the idea that if you follow the default conventions, then your
builds will be much simpler. So while you can change the
source directory, you don't need to explicitly specify the source directory.
Gradle comes with logical defaults. This is also called convention over
configuration.
In java plugin
there are conventions like source must be in src/main/java,tests must be
in src/main/test, resources in src/main/resources, ready jars
in build/libs and so on. However, Gradle do not oblige you to use
these conventions and you can change them if you want.
Declarative
The
idea behind declarative is that you don't have to work on the
task level, implementing/declaring/configuring all tasks and their dependencies
yourself, but can work on a higher, more declarative level. You just say
"this is a Java project" (apply plugin: "java"), "here
is my binary repository" (repositories {...}), "here are my
sources" (sourceSets {...}), "these are my dependencies"
(dependencies {...}). Based on this declarative information, Gradle will then
figure out which tasks are required, what their dependencies are, and how they
need to be configured.
The
idea of the build being declarative is that you don't need to specify every
step that needs to be done. You don't say "do step 1, do step 2,
etc". You define the plugins (or tasks) that need to be applied and gradle
then builds a task execution graph and figures out what order to execute things
in.
Gradle
has three distinct build phases
- Initialization
Gradle supports single
and multi-project builds. During the initialization phase, Gradle determines
which projects are going to take part in the build, and creates
a Project instance for each of these projects.
- Configuration
During this phase the
project objects are configured. The build scripts of all projects
which are part of the build are executed. Gradle 1.4 introduced
an incubating opt-in feature called configuration on
demand. In this mode, Gradle configures only relevant projects
- Execution
Gradle determines the subset of the tasks, created and configured during
the configuration phase, to be executed. The subset is determined by the task
name arguments passed to the gradle command and the current
directory. Gradle then executes each of the selected tasks.
Introduction to Groovy

When
we discuss about gradle, the discussion may incomplete if we forget to mention
a word about Groovy. Groovy is a JVM language which has the OOP capabilities
.In Groovy website they have mention that
“Apache Groovy
is a powerful, optionally typed and dynamic language,
with static-typing and static compilation capabilities, for
the Java platform aimed at improving developer productivity thanks to a
concise, familiar and easy to learn syntax. It integrates smoothly
with any Java program, and immediately delivers to your application powerful
features, including scripting capabilities, Domain-Specific Language authoring,
runtime and compile-time meta-programming and functional programming.”
Basic Gradle Commands
By
typing gradle – – help in cmd you can see the list of commands that you
can use in command line .There are list of preconfigured properties in gradle
which is configured to make your work easy. You can view those properties by
typing gradle --properties in your command window . gradle task is another
popular gradle command which we will use very often and will discuss it later
in this post.
build.gradle File
This
is the name that they use for build file in gradle.Using build.gradle file we
can give instructions to the Gradle.As developers we heavily work with this
file.This is the place where you can find Groovy Scripts.We can specify
different tasks inside this file.When we specify tasks in build.gradle file
gradle build system will execute those tasks for us.
Gradle Installation
We can install gradle in
different ways
- From web
- Using Groovy environment manager
After
downloading gradle from http://gradle.org/ website extract it in your machine
and set your environment variable path to
the bin folder of the extracted gradle.Now you need to check whether
environment variables are properly set and gradle is working on your machine.
Type gradle in your cmd

Working with Tasks in
Gradle
Now
you can select any preferred location in your machine and create build file
with .gradle extension. Every Gradle project contains a build file called
build.gradle. Which contains the tasks (plugins and dependencies)
Fundamental
activity in Gradle is task .Now you may think what is the meaning of a task in
gradle is. Simply it’s a code that gradle execute .Each task has its own
lifecycle with initializing, execution and configuring phases. Task will also
contains properties and actions (first and last)
Groovy is a JVM language and its Object Oriented .In
gradle build script top-level object is called as project. There is a one-to-one relationship between
a Project and a build.gradle file. During build
initialization, Gradle assembles a Project object for each project
which is to participate in the build.If you need to learn more about project
visit https://docs.gradle.org/current/dsl/org.gradle.api.Project.html
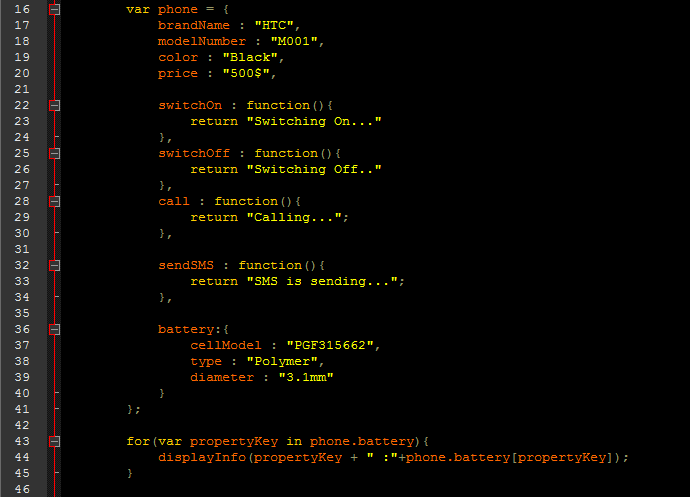
project.task("TaskA")
Let’s
see some different ways of declaring task inside build.gradle

You
can use any of these methods to declare a task inside build file by typing gradle tasks in the cmd
(should be inside the directory where you place your build.gradle) you can get
the declared task list.

Above
we have discussed that task can have properties and actions .Here I have write
some task which contains actions and properties.

To
view all task you can use gradle
tasks & if you need to execute any task alone you can use gradle
<task_name>


We
have lot more to discuss about Gradle .It seems we need to discuss those in
another post .I have some reference suggestions for you
Happy
build :D