How to
configure openCV project in visual studio
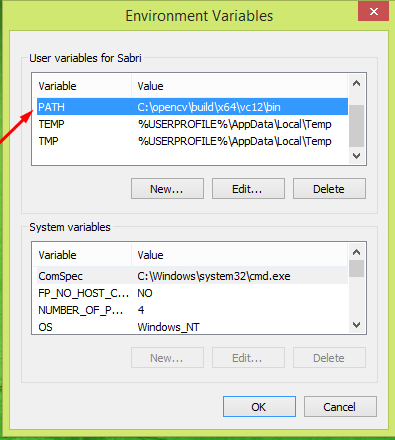
First of all make sure that you have extracted the selected
version of openCV library into the selected folder of your machine & set
the environment variables correctly.
If you have missed any single step of above process your
project won’t work. According to my view it’s better to download and extract
the stable version of openCV library (As it has many posts in forums and
solutions for the general questions that appear in the development process)
First you need to create a new project. Follow the steps
given below
Go to File -> new -> project and select visual
C++ and create windows32 Console Application

After you press OK
button below window will appear

Then Press Next > and tick empty project

Then right
click on your project source files -> files -> Add ->New Item
->C++ file (.cpp) (Enter a name)
Then right
click on your project name and go to properties


If your
machine is 64 bit.Go to configuration manager and click new .

Then New
Project Platform window will open


Close the
configuration manager window.
The Go to C++
-> General ->Additional Include Directories -> Click on the dropdown and select edit
Here you
need to include 3 directories (In my case)
· C:\opencv\build\include
· C:\opencv\build\include\opencv
· C:\opencv\build\include\opencv2


Click OK and
go to the Linker -> General -> Additional Library Directories &
add the path to your VS lib(C:\opencv\build\x64\vc10\lib)
Here you
must aware about your
· Operating System (x64)
· Visual Studio Version (vc10)

As the final step of configuration you need to go to Linker
-> Input -> Additional Dependencies
Here you need add additional dependency library files. Usually
it differ from openCV version to version (In openCV3 there is only 2 dependencies)
.In my case I have to copy all the bellow libraries into additional dependencies
(I am using old version of openCV)

Then Press OK & Apply
Now it’s the time to check whether our application is working correctly
.Type this program in your .cpp file and right click on your project and click open
folder in windows explorer and copy face.jpg in to the folder.

Finally
Build your solution and run .If you done all the configuration correctly you
will get the bellow output

Please find the summary of our process bellow
· Right Click on Project ->
properties ->Configure Manager ->Platform at table ->new ->x64
->OK
· C/C++ ->General ->Additional
include directories ->
o
->……/include
o
->……/include/opencv
o
->……/include/opencv2
· Linker -> General -> Additional
library directories
->x64/vs10/lib
· Linker ->input ->Additional
Dependancies -> Copy paste Library list
opencv_calib3d247d.lib
opencv_contrib247d.lib
opencv_core247d.lib
opencv_features2d247d.lib
opencv_flann247d.lib
opencv_gpu247d.lib
opencv_highgui247d.lib
opencv_imgproc247d.lib
opencv_legacy247d.lib
opencv_ml247d.lib
opencv_nonfree247d.lib
opencv_objdetect247d.lib
opencv_ocl247d.lib
opencv_photo247d.lib
opencv_stitching247d.lib
opencv_superres247d.lib
opencv_ts247d.lib
opencv_video247d.lib
opencv_videostab247d.lib
(This library files are differ for versions of opncv )
Special
thanks goes to Miss.Yovini Yashodara J
Here you can
download opencv and just try it http://opencv.org/downloads.html