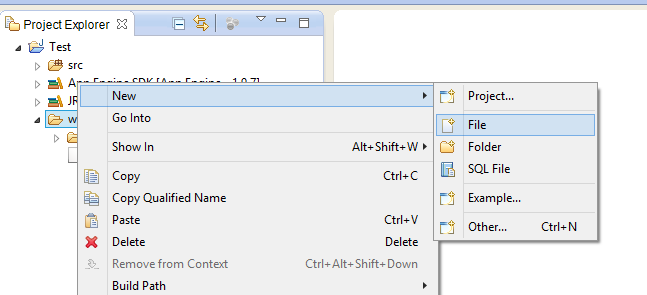
Pages

Sunday, July 27, 2014

What is the DOM?

What is meant by the DOM (Document Object Model?).Is it a programming language? Part of a JavaScript? There are thousands of questions in our mind when we hear the word DOM for the first time.
In normal perspective;


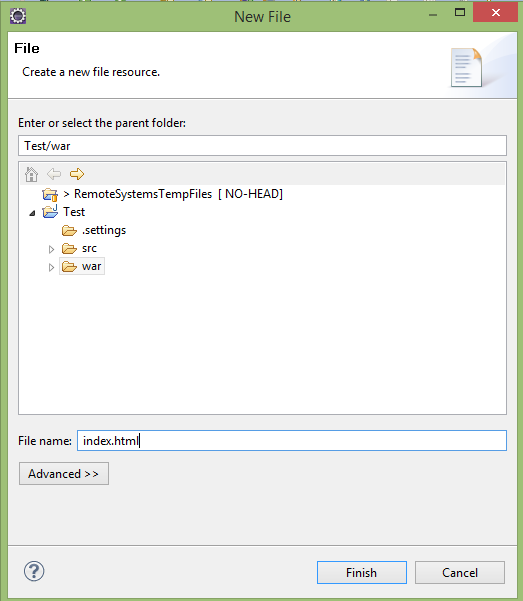
So let’s see what the objects in HTML document are. As in the real document we can decompose our original html document into several objects like title tag, header (EX:<h1> )tags, img tag and also we can consider the whole document as one object,


Because sometimes an object may contain other objects too. If we take <ul>(unordered list) for example, it contains several <li> (list) items.
Now definitely you may be wondering what is meant by “Model”, that we have mentioned in “document object model”. Do you know there is a JavaScript term for every object in html page? If any part (or object) in the html document is represented using tree structure, we can explain it as a “model”. Oh do you feel uncomfortable with that term? Please don’t, it’s absolutely a simple thing as mentioned below.


In JavaScript, there are agreed upon terms to access each object mentioned above. On another day we will discuss how to access those elements using JavaScript terms.  

Thursday, July 24, 2014

How to host my website in GitHub for free

  1. GitHub is a web-based Git repository hosting service, which offers all of the distributed revision control and source code management (SCM) functionality of Git as well as adding its own features.
To host your website in GitHub you don't need to be a programmer and you don't even need to touch the command line you can do it .So first you need to go to the github.com and create a GitHub account. Then click on the “+” sign on right top corner of your account and create a new repository.


Then give a name to your repository and it’s up to you but make sure it’s memorable and short. Next you have to make your repo public (If you select privet you have to pay).Before create the repo initialize it with a README .Finally click on create repo.


After you finish it your repository will be look like this.


Then download GitHub client for windows https://windows.github.com/  (There is a client for mac https://mac.github.com/  too).Then go to your GitHub in windows.


Click on the plus sign on left top corner of your GitHub window & then click on clone.


It will display the set of repositories in your GitHub account.In my case I will select the test and click on clone test.


Select a location in your local machine to clone the repo.After you select the location GitHub client will automatically clone the repo into the local machine.


After finish the cloning .GitHub window will show the content of GitHub project as below.


Now we need to create a GitHub pages (GitHub Pages are public webpages freely hosted and easily published through GitHub site).In the above picture you can see a small dropdown icon with the name of “master” .Create a new branch as gh-pages as I express below.


Then add your website (js, css, html files) to the GitHub folder in your local machine (where you clone your GitHub repo).But make sure that your homepage named as index.html.


In your windows GitHub client will display a message about uncommitted changes.


Click on uncommitted changes and add a meaningful commit to it like “Adding my site”.


After adding your commit click on publish icon on right top corner. Now go to your online GitHub repo and refresh it.Then you will see there are two branches. Just click on it and go to gh-pages.(No need of following this step ,it just for enjoying your work J).


Wait for 10 minutes and type
http://your user name.github.io/your repository name/
Here are some small things I have done using GitHub

I think you may interest to read this


Sunday, July 20, 2014

How to host your website using Google App Engine


First we are going to learn how to create Google App Engine application using eclipse.
  •        To do that first you need to install Google plugin for eclipse.
  •        Then you have to create web application project in eclipse.
  •                    Finally you have to deploy it .


As the first step go to http://appengine.google.com
figure - 01


You must logging to your Google account.If you are new to Google App Engine it will display.

figure - 02
Then click on Create Application button.Then below window will be loaded.


Application Identifier must be between 6 and 30 characters. Lowercase letters, digits, and hyphens are acceptable characters. Must start with a letter. Trailing hyphens are prohibited.


You can change your Application title anytime but you cannot change your application identifier.

Then open eclipse and select a work space for your project. Now you have to Google to find Google eclipse plugin. In my case Google eclipse plugin Kepler.

figure - 05


figure - 06


 https://dl.google.com/eclipse/plugin/4.3 copy this URL and follow the instruction on the above site to install that plugin into your eclipse

We only need to install
figure - 07

After you installing the software blue color Google icon will appear in the top menu.
figure - 08

Click on that icon and create Google web application project.
figure - 09

Then it will leads to the bellow window.Project name and package name is up to you.
figure - 10


Then the  project structure will looks like
figure - 11


Just delete the Test.html & Test.css  .Then create your own index.html file inside war folder.
figure - 12


figure - 13


Type anything  you need to display in your web page just like below.

figure - 14


 Your console tab will looks like below
figure - 15

Then open your web browser and go to the link http://localhost:8888/
Or http://127.0.0.1:8888/ . you will have the output you wish to have.


Now I am going to deploy my web application in App Engine.Before doing that first you need to  stop your application.
figure - 16
figure - 17

Then it will ask you to logging to your Google account.


figure - 17
figure - 18
Then click on accept button to continue.Then this window will appear.
figure - 19


Then click on the link “App Engine Project settings”
 
figure - 20

Now you have to give the Application ID .Application ID is the one you created in https://appengine.google.com/ the hello-webapp1
figure - 21

 Then it’s ready to deploy
figure - 22


figure - 23


Now any one can access it by using this url http://1-dot-hello-webapp1.appspot.com/

figure - 24

I would like to share some small things I have done using App Engine .Here are the links

(If you forget your app URL go to the Administration Application settings and You will find your URL under  Application Identifier Alias J)


All in One Line

Friends isn't it really hard to change the directory in cmd by typing or copying the full path manually. Let’s find an easy way to do it. Even the UI of the command prompt is not much friendly, it support many cool things. Did u know that you can drag and drop your file into cmd to change the path.


Now you are in   C:\Users\Nadeesha>
Assume that you need to change your directory to the G:\cmd\new folder


 After you drag your folder into cmd it will look like this;


But just doing that will not allow you to change your directory .So u need to type few more words

cd G:\cmd\new && G:

Is it possible to run commands simultaneously? Yes, to do that you need to put “&&” in between two commands and cmd will start to execute commands from right-hand side. In this case it will first change the driver G: and then execute cd G:\cmd\new. After executing all commands it will give below output.


Thursday, July 17, 2014

Numbers

When we assign a number to a variable using JavaScript there will be numerous questions in our mind mostly when we are familiar with other programming languages like java, c.


Whether this number is
          A long integer
          Short integer
          Or floating point?

But do you know “Internally all JavaScript numbers are considered as 64 bit floating point numbers”. But it will not be a big issue as JavaScript is a client side programming language and not a server based one.


Wednesday, July 16, 2014

What is the technical difference between PREFIX & POSTFIX versions of INCREMENT & DECREMENT OPERATORS?


Let’s assume var A= 3; and var B=6; below you can see 4 different ways of incrementing and decrementing a variable value. At the end of each operation the end result is same. It doesn’t matter whether you are using A=A+1; or A+=1; or A++; or ++A; it will give A=4 as the end result of each.


But let us discuss what the difference is between A++; (POSTFIX) & ++A; (PREFIX) operators. To identify the difference clearly you can use the code given below.


This means when you use prefix it will increment or decrement the value through the execution and if you use postfix it will increment or decrement the value at the end of the execution process of the particular instruction (after the semicolon).

Tuesday, July 15, 2014

Identifying the difference between the “Assignment Operator” & “Equality Operator” in JavaScript


Let’s see how to get rid of malfunctioning which occur in our application because of the misuse of “=” operators.

We can use “=” in three ways. They are;
        
     1)    “= “ used as Assignment operator(Assign value for a variable)
var A=10;

     2)   “==” used as Equality operator(check equality )
if(A==10) {
                                                          // Run this
}

      3)   “===” used as Equality operator (check equality )
If(A===10){
                                                        //Run this
}

Now you may wonder what the difference is between operators used in number (2) and (3).

To have a clear idea about this let’s see an example,
var A=123;
var B=”123”;
If(A==B){
          alert(“Variable A is equal to the variable  B”);
}
else{
          alert(“Variable A is not equal to the variable  B”);

}


var A=123;
var B=”123”;
If(A===B){
          alert(“Variable A is equal to the variable  B”);
}
else{
          alert(“Variable A is not equal to the variable  B”);

}


So we can say “==” is used for equality (it just simply checks the similarity and does not concern about variable types and so on) and “===”use to check strict equality (used for strict equality check where it also concerns about whether the two value’s and their variable types are same )