Pages

Saturday, February 21, 2015

How to solve “Java was started but returned exit code = 13” in eclipse


Let’s see how to solve “Java was started but returned exit code =13”.Most of the time it will happen when you have updated your jdk to 7 or higher J
You may wonder how it will effect on you eclipse, this mainly due to incompatible sdk and jdk versions.Also it may occur if you try to use 32 bit java version for 64 bit eclipse.


Let’s see what are the steps we need to follow to solve this problem  .As the first step open your eclipse.ini file inside your eclipse folder(in my case eclipse-java-luna-SR1a-win32-x86_64) and check whether there is a path which is pointing to your jdk .


If not simply locate your jdk javaw.exe file path into your eclipse.ini .But please make sure that you have add the above 2 lines just before the –vmargs and after the openFile .After you completing this your editor should be like this


Now your problem is over…………enjoy J

Friday, February 20, 2015

No More VirtualBox with windows 8.1

Actually this is a very simple and recommended way of using virtual machine in windows 8 .Furthermore it can defined as an attractive way of getting our job done. No more virtualbox or no more duel boot needed.

What you all need to do is select a particular place in your hard disk and create a folder called Hyper-V then open hyper-v manager (search on your start).Then simply you will get below window .Now you need to click on your PC name (Underlined)
figure - 01


Then you will get the extended Hyper-V Manager ;) 

Go to hyper-v settings->server->Virtual Hard Disk and give the path to your previously created Hyper-V folder and your location should be like this
E:\Hyper-V\Virtual Hard Disks

figure - 02


Also go to hyper-v settings->server->Virtual Machine and give the path to your previously created Hyper-V folder and your location should be like this
E: \Hyper-V\Virtual Machines

figure - 03

Click apply & ok
Now go and check your Hyper-V folder and you may see it contains two new folders called Virtual Hard Disk & Virtual Machine.

Now it’s the time to download Ubuntu IOS .Go to www.ubuntu.com and download it, If you need you can go to my previous VirtualBox post and use the download link it provides).
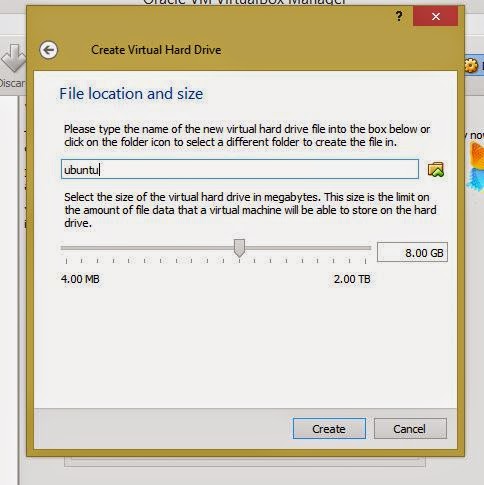
Now it’s the time to create a new virtual machine .Go to new->virtual machine as the below image indicate.


figure - 04


Then you will get the below window.
 
figure - 05


Go to next and give a preferred meaningful name to your virtual machine in my case I have used Ubuntu-14.04.1 and I named my virtual machine as Ubuntu 14  .
      
figure - 06
                            

Click nextà next à

figure - 07


Now you need to allocate the memory. I have allocated the 1024MB for the startup memory.

figure - 08

Click next. For the moment I am not going to configure the networking part so click next .And now we need to assign a size for our virtual hard disk.Here I have allocate 30GB for the virtual hard disk.

figure - 09


Click next
I am going to install my OS later so click next.

figure - 10

And as the final step in the wizard click next & finishJ

figure - 11


Now you will get this window

figure - 12


Right click on your virtual machine and go to settings

figure - 13


Click on add legacy network adapter (it will be helpful in establishing network connectivity, probably be the next post ;-)) and click add. Then apply .

figure - 14

Then click on Network adapter and click remove and apply.

figure - 15

Now go to IDE Controller 1 and select DVD Drive .then select image file and browse your image file. and click on apply .

figure - 16

Go to automatic start action under Management under management and select nothing and click apply.

figure - 17


Select automatic stop action select shut down the guest operating system and click on apply and ok.

figure - 18


Now right click on your virtual machine and click on start and connect

figure - 19

figure - 20

                      Click on install Ubuntu.

figure - 21

Click on continue
figure - 22

Click on install now

figure - 23

figure - 24


figure - 25

figure - 26


figure - 27

Click on ENTER

figure - 28


figure - 29


figure - 30


If you need to shut down or save your machine status you can use these buttons. Now the things almost done .Enjoy your virtual machine J

Wednesday, February 18, 2015

How to Install Ubuntu on Oracle Virtual Box


What you all need is
  1. VirtualBox setup
  2. Ubuntu ISO image

You can download the  VirtualBox setup here (https://www.virtualbox.org/wiki/Downloads ).If you need you can read the Oracle VM VirtualBox® User Manual (http://www.virtualbox.org/manual/UserManual.html ).

Please make sure you have downloaded the correct VirtualBox platform package (VirtualBox 4.3.22 for Windows hosts  x86/amd64  for windows)

figure-01


Then go to Ubuntu.com (http://www.ubuntu.com/download ) and download Ubuntu Desktop (Ubuntu 14.04.1 LTS). Now we are ready for the installation J


figure-02


Install VirtualBox by clicking next->next->………… and finally finish. At the end you will get the below window.


Click on NEW button at the left top corner of the interface .Then you will get below window and just type “Ubuntu” in the name field and click next.
figure-04

Then you need to allocate the RAM size (please make sure the allocated memory size is not less than 512MB).Then click next.
figure-05


Click on Create


figure-06


figure-07


figure-08


Now you need to select the file location and size. If you didn’t allocate a particular location it will automatically install in your C:\ drive. After allocating a location, select the size of your virtual hard disk (up to your preferences).


figure-09


figure-10


Then click on CREATE. Now you need to right click on Ubuntu and go to SETTINGS because here you need to change 3 things SYSTEM, STORAGE & NETWORK

 
figure-11
Then go to SYSTEM and uncheck “floppy” from “Boot Order” and scroll down. Then you will get the below window.

 
figure-12


Now click on STORAGE and select EMPTY under the “controller:IDE”. Under the ATTRIBUTES section, you may find CD/DVD drive and there will be a small CD/DVD icon. Click on it and select “Choose a virtual CD/DVD disk file” and give the location to ur previously downloaded ISO file.

figure-13


Then you can see the location of the ISO file under the information section.

 
figure-14


Now click on NETWORK and select “BRIDGED NETWORK “

figure-15


Now almost done J then click on ok and exit from settings .Lets start our virtual machine J by clicking on start (Green color icon at the top left corner of the window).

 
figure-16

                                                                                                                                          
figure-17


Now we are going to move on to the most important part of this discussion. If you get “This kernel requires an x86-64 CPU, but only detected an i686 CPU. Unable to boot - please use a kernel appropriate for your CPU” this error means you need to enable hyper-v in your machine. First of all go to windows features and check whether hyper-v is ticked or not

figure-18

Sometimes you may need  to enable hyper-V  in BIOS too ,for more information (http://h30434.www3.hp.com/t5/Desktop-Hardware/How-to-Enable-Intel-Virtualization-Technology-vt-x-on-HP/td-p/3198063 ) Let’s meet with another post No More VirtualBox with windows 8.1