Getting Started with Servlet
Hello friends, today we are going to create a simple
project with servlet. As the first step you need to create Dynamic Web Project .Please follow the steps given bellow.
What is servlet?
We can describe servlet in many ways
Servlet is a
·
Technology - used
to create web application
·
API that provides
many interfaces and classes including documentations
·
Interface that
must be implemented for creating any servlet
·
Servlet is a class
that extend the capabilities of the servers and respond to the incoming
request. It can respond to any type of requests
·
Servlet is a web
component that is deployed on the server to create dynamic web page
Simply
A servlet is a Java programming
language class that is used to extend the capabilities of servers that host
applications accessed by means of a request-response programming model.
My favorite definition for servlet is “Servlet is a
web component (Web Components are a set of standards currently
being produced by Google engineers as a W3C specification that allow for the
creation of reusable widgets or components in web documents
and web applications) that is deployed on the server to create
dynamic web page”
What is Tomcat?
Apache Tomcat, often referred to as Tomcat, is an
open-source web server developed by the Apache Software Foundation (ASF).
Tomcat implements several Java EE specifications including Java Servlet,
JavaServer Pages (JSP), Java EL, and WebSocket, and provides a "pure
Java" HTTP web server environment for Java code to run in.
 |
| Figure - 01 |
 |
| Figure - 02 |
 |
| Figure - 03 |
Make sure that you have
checked “Generate web.xml deployment
descriptor “checkbox.
 |
| Figure - 04 |
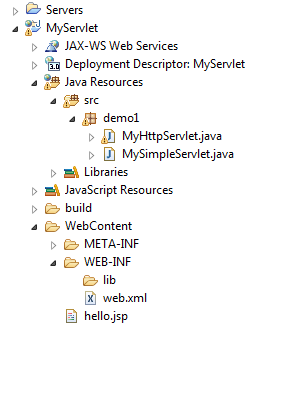
After you following the
given step your project folder structure should look like this
 |
| Figure - 05 |
Now it’s the time to add
TOMCAT server into eclipse
 |
| Figure - 06 |
Go to server tab (it
usually appears in the bottom next to your console window) and click on the
link “No servers are available.click this link to create a server...”.When you
click on it you will redirect into below window
 |
| Figure - 07 |
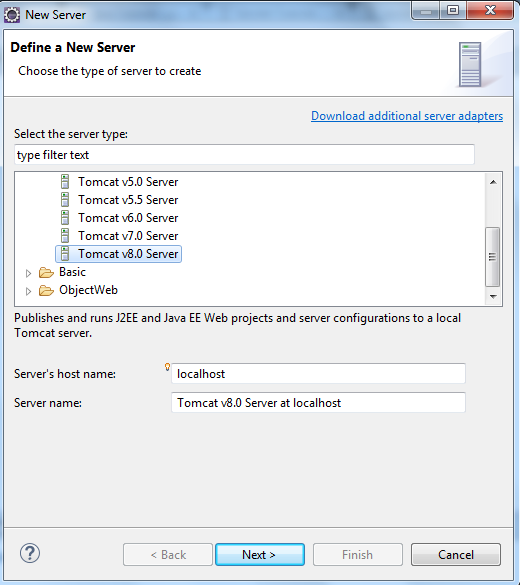
From there you need to go
to Apache and select the Tomcat
version which is compatible with your installed java version and follow the
steps given below.
 |
| Figure - 08 |
 |
| Figure - 09 |
After click next you need
to browse the location where you unzip your Tomcat folder. If you still not
download and install Tomcat into your machine here you can select Download and Install option except browse
 |
| Figure - 10 |
After adding Tomcat
follow the steps given bellow
Here you have to select
your project and click Add to
configure them on server
 |
| Figure - 11 |
 |
| Figure - 12 |
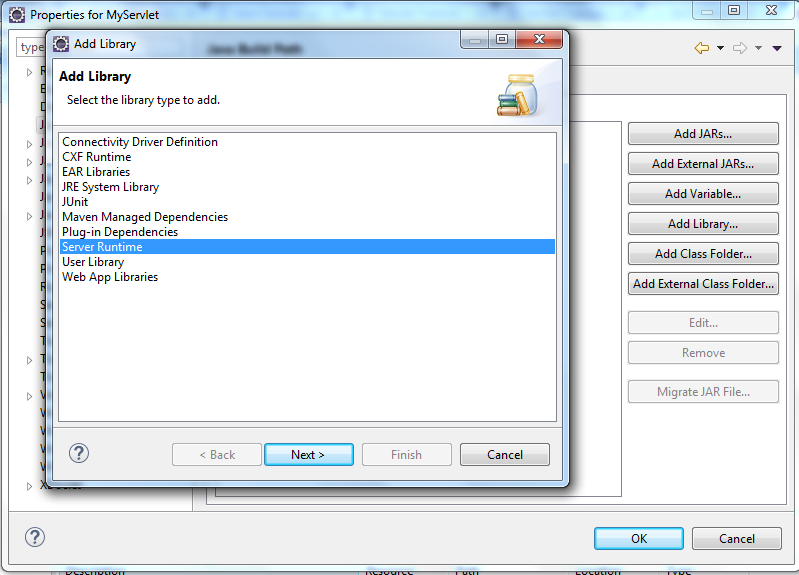
After finish the above
steps right click on your project and go to properties ->Java Build
Path->Add Library ->Server Runtime->Tomcat and click next and finally click ok and exit from the property window.
 |
| Figure - 13 |
 |
| Figure - 14 |
 |
| Figure - 15 |
 |
| Figure - 16 |
 |
| Figure - 17 |
Now the project
configuration part is over. Let’s try with simple servlet class file. To create
your java class file right click on your default package ->New ->class
 |
| Figure - 18 |
Then give appropriate
package name and java class name and click finish
 |
| Figure - 20 |
As we learn earlier here
we need to implements servlet interface in our MySimpleServlet.java class .To
do this type implements after your
class name and hit ctrl + space by typing servlet
And add Servlet –
javax.servlet interface
 |
| Figure - 21 |
After implementing
Servlet interface your class file will look like below
 |
| Figure - 22 |
Here you need to click on
the yellow color bulb with Red Cross to implement unimplemented methods .After
you adding unimplemented methods into your class it will look like below
 |
| Figure - 23 |
Here you can see 5
methods. When we come to this stage it will be better to know little about Servlet - Lifecycle
 |
| Figure - 24 |
init() Method
·
Called by the servlet container to indicate to a
servlet that the servlet is being placed into service.
·
The servlet container calls the init method
exactly once after instantiating the servlet.
·
The init method must complete
successfully before the servlet can receive any requests.
·
The servlet container cannot place the servlet
into service if the init method
o
Throws a ServletException
o
Does not return within a time period defined by
the Web server
service() Method
·
Called by the servlet container to allow the
servlet to respond to a request.
·
This method is only called after the servlet's init() method
has completed successfully.
·
The status code of the response always should be
set for a servlet that throws or sends an error.
·
Servlets typically run inside multithreaded
servlet containers that can handle multiple requests concurrently.
·
Developers must be aware to synchronize access
to any shared resources such as files, network connections, and as well as the
servlet's class and instance variables.
·
Main method use to perform actual task
·
Servlet container calls service method to handle
request coming from the browser &
handle the response to the client
·
Each time the server receives a request for a
servlet, the server use a new thread and calls service.
·
The service () method is called by the container
and service method invokes doGe, doPost, doPut
destroy() Method
·
Called by the servlet container to indicate to a
servlet that the servlet is being taken out of service.
·
This method is only called once all threads
within the servlet's service method have exited or after a timeout
period has passed.
·
After the
servlet container calls this method, it will not call the service method
again on this servlet.
·
This method gives the servlet an opportunity to
clean up any resources that are being held (for example, memory, file handles,
threads) and make sure that any persistent state is synchronized with the
servlet's current state in memory.
Don’t you have this doubt?
Why we require destroy () method even though we have finalize () in java servlet
Why we require destroy () method even though we have finalize () in java servlet
There is no hard and fast rule that whether we should use a
destroy method or a finalize method in our program. But the way these methods
are invoked by the JVM differ. As we know that the finalize method is called by
the GC (Garbage Collector), before it cleans an object reference from the
memory. This means that your JVM don't have any control over it. Where as in
case you want to free up the resources at that particular instance then you
need to have a destroy method. Hope this clarifies your doubt.
If you need descriptive information about doPost(),doGet()….methods
please refer servlet documentation.( https://tomcat.apache.org/tomcat-5.5-doc/servletapi/javax/servlet/http/HttpServlet.html
)
Add something in sysout to test our application
 |
| Figure - 25 |
Before hit the run button you need to do some modification
to your web.xml file .In other word you need to add application's deployment descriptor.
A web application's deployment descriptor describes the
classes, resources and configuration of the application and how the web server
uses them to serve web requests. When the web server receives a request for the
application, it uses the deployment descriptor to map the URL of the request to
the code that ought to handle the request.
The deployment descriptor is a file named web.xml. It
resides in the app's WAR under the WEB-INF/ directory. The file is an
XML file whose root element is <web-app>.
For more information read this article (https://cloud.google.com/appengine/docs/java/config/webxml)
 |
| Figure - 26 |
Below your display – name tag add a servlet tag
 |
| Figure - 27 |
Then give servlet – name (you can give any name for servlet name)
 |
| Figure - 28 |
Add servlet mapping section
 |
| Figure - 29 |
 |
| Figure - 30 |
Now you can run your application .hit the green color green button in top left corner .Then it will display the below window
 |
| Figure - 31 |
Click finish and wait for 3 to 5 seconds it will open a
small browser window (modify the address as below and hit enter)
 |
| Figure - 32 |
In your console you can see the message that you have given
in the sysout (println)
Before proceeding with other examples I think it will be
better to know little about Servlet Class Hierarchy
Servlet Class Hierarchy
 |
| Figure - 33 |
Visit (http://way2java.com/servlets/java-made-clear-difference-servlet-genericservlet-httpservlet/
)
 |
| Figure - 34 |
Create a class call MyHttpServlet inside the package demo
which you create previously
Extends your class from HttpServlet
 |
| Figure - 35 |
 |
| Figure - 36 |
Now we need to override the doGet method here right click on your class and go to source - > override/implement Method -> check doGet checkbox
Final Output
 |
| Figure - 37 |
 |
| Figure - 38 |
 |
| Figure - 39 |
 |
| Figure - 40 |
Add another servlet tag to your web.xml file as below
 |
| Figure - 41 |
 |
| Figure - 42 |
As the final step, now we are going to add simple jsp file
into our project follow the steps given below
Right click on your Web-Content folder and add a jsp file
 |
| Figure - 43 |
When you add your jsp file your folder structure will look like bellow
 |
| Figure - 44 |
Then Add some content into your
JSP file
 |
| Figure - 45 |
 |
| Figure - 46 |
When you hit the run button you will get the bellow output
Please make sure the address is correct
You can copy this address into your browser and get the same
output .This is the end of this post and will meet with another JSP post soon
.Happy Coding with JSP ;)