How to Install Ubuntu on
Oracle Virtual Box
What you all need is
- VirtualBox setup
- Ubuntu ISO image
You can download the VirtualBox setup here (https://www.virtualbox.org/wiki/Downloads
).If you need you can read the Oracle VM VirtualBox® User Manual (http://www.virtualbox.org/manual/UserManual.html
).
Please make sure you have
downloaded the correct VirtualBox platform package (VirtualBox 4.3.22 for
Windows hosts x86/amd64 for windows)
 |
| figure-01 |
Then go to Ubuntu.com (http://www.ubuntu.com/download ) and
download Ubuntu Desktop (Ubuntu 14.04.1 LTS). Now we are ready for the
installation J
 |
| figure-02 |
Install VirtualBox by clicking next->next->………… and finally finish. At the end you will get the below window.

Click on NEW
button at the left top corner of the interface .Then you will get below window
and just type “Ubuntu” in the name field and click next.
 |
| figure-04 |
Then you need to
allocate the RAM size (please make sure the allocated memory size is not less
than 512MB).Then click next.
 |
| figure-05 |
Click on Create
 |
| figure-06 |
 |
| figure-07 |
 |
| figure-08 |
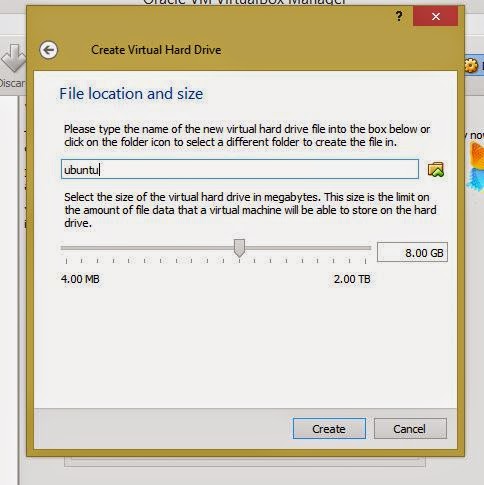
Now you need to
select the file location and size. If you didn’t allocate a particular location
it will automatically install in your C:\ drive. After allocating a location,
select the size of your virtual hard disk (up to your preferences).
 |
| figure-09 |
 |
| figure-10 |
Then click on
CREATE. Now you need to right click on Ubuntu and go to SETTINGS because here
you need to change 3 things SYSTEM, STORAGE & NETWORK
 |
| figure-11 |
Then go to SYSTEM
and uncheck “floppy” from “Boot Order” and scroll down. Then you will get the
below window.
 |
| figure-12 |
Now click on
STORAGE and select EMPTY under the “controller:IDE”. Under the ATTRIBUTES
section, you may find CD/DVD drive and there will be a small CD/DVD icon. Click
on it and select “Choose a virtual CD/DVD disk file” and give the
location to ur previously downloaded ISO file.
 |
| figure-13 |
Then you can see the location of the ISO file
under the information section.
 |
| figure-14 |
Now click on
NETWORK and select “BRIDGED NETWORK “
 |
| figure-15 |
Now almost done J
then click on ok and exit from settings .Lets start our virtual machine J
by clicking on start (Green color icon at the top left corner of the window).
 |
| figure-16 |
 |
| figure-17 |
Now we are going
to move on to the most important part of this discussion. If you get “This
kernel requires an x86-64 CPU, but only detected an i686 CPU. Unable to boot -
please use a kernel appropriate for your CPU” this error means you need to
enable hyper-v in your machine. First of all go to windows features and check
whether hyper-v is ticked or not
 |
| figure-18 |
Sometimes you may need to enable hyper-V in BIOS too ,for more information (http://h30434.www3.hp.com/t5/Desktop-Hardware/How-to-Enable-Intel-Virtualization-Technology-vt-x-on-HP/td-p/3198063
) Let’s meet with another post No More VirtualBox with windows 8.1
No comments:
Post a Comment