Android
activity life cycle and android studio debugging using logact.
Hi friends, today we
are going to learn how to use logcat for debugging your code in android studio.
For the demonstration I’ll use android activity life cycle J.If
you are new to android there may be numerous questions in your mind about
android activity lifecycle.
What is the lifecycle
of android activity?
Why are those similar
sounding methods (onCreate(), onStart(), onResume()) called during
initialization,& others (onPause(), onStop(), onDestroy()) called
at the end?

Normally android
activity have 6 status
1.
Created
2.
Started
3.
Resumed
4.
Paused
5.
Stopped
6.
Destroyed
And android activity
life cycle has 7 methods.Let’s
get an idea about each of these methods from http://developer.android.com/
Method
|
Description
|
onCreate()
|
Called
when the activity is first created. This is where you should do all of your
normal static set up: create views, bind data to lists, etc. This method also
provides you with a Bundle containing the activity's previously frozen state,
if there was one.Always followed by onStart()
|
onRestart()
|
Called
after your activity has been stopped, prior to it being started again.Always
followed by onStart()
|
onStart()
|
Called
when the activity is becoming visible to the user.Followed
by onResume() if the activity comes to the foreground,
or onStop() if it becomes hidden.
|
onResume()
|
Called
when the activity will start interacting with the user. At this point your
activity is at the top of the activity stack, with user input going to it.
Always
followed by onPause().
|
onPause
()
|
Called
as part of the activity lifecycle when an activity is going into the
background, but has not (yet) been killed. The counterpart to onResume().
When activity B is launched in front of activity A, this callback will be
invoked on A. B will not be created until A's onPause() returns, so be sure
to not do anything lengthy here.
|
onStop()
|
Called
when you are no longer visible to the user. You will next receive either
onRestart(), onDestroy(), or nothing, depending on later user activity.
Note
that this method may never be called, in low memory situations where the
system does not have enough memory to keep your activity's process running
after its onPause() method is called.
|
onDestroy()
|
The
final call you receive before your activity is destroyed. This can happen
either because the activity is finishing (someone called finish () on it, or
because the system is temporarily destroying this instance of the activity to
save space. You can distinguish between these two scenarios with the
isFinishing() method.
|
Ø When
the Activity first time loads the events are called as below:
onCreate()àonStart()àonResume()
Ø When
you click on Phone button the Activity goes to the background
and the below events are called:
onPause()àonStop()
Ø Exit
the phone dialer and the below events will be
called:
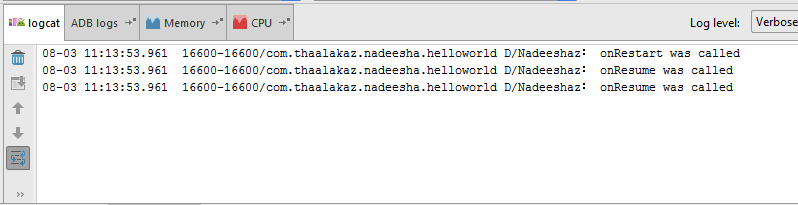
onRestart()àonStart()àonResume()
Ø When
you click the back button OR try to finish() the
activity the events are called as below:
onPause()àonStop()àonDestroy()
Now we are going to look at our hello world application which we gonna
use for demonstrating above situations.Edit your MainActivity.java file as below.
MainActivity.java


You
may wonder why I am using Log.d (“some text1”,”sometext2”) allover my code. The Android logging system provides a mechanism for
collecting and viewing system debug output. Logcat
dumps a log of system messages, which include things such as stack traces when
the emulator throws an error and messages that you have written from your
application by using the Log class.


I am using Log.d() to
display my message.As you can see log class contains two parameters called tag
& msg .Here I am using “Nadeeshaz” as the tag name for filtering purpose.for
the msg I have used the relevant message for each section.

By pressing alt + 6 you
will get the logcat window .It shows the logs for selected application. But
there it’s really hard to find the log with our tag name.

Go to the drop down
list(highlighted) in your right-hand side & select “Edit filter configuration”.

When you click on it
you will get the below window.

You have to fill Log Tag with you tag name in my
case its “Nadeeshaz” and then you have to give a meaningful name for Filter Name
.For more conventions I will use the same name for the filter name.


Then the logcat window will only show the messages
with relevant tag value


Now I am going to open my HelloWorld app

When it open my logcat window shows below logs

When I press home button

It gives below logs

Now I am in

When I open it again

It gives below logs
As the final step I click on the back button

These are the logs I got

I think this help you to understand a little about
android activity life cycle and android studio debugging using logact J
.


